
Disk Internals & Data Recovery (2): Skip strings | grep and Solve picoCTF Disk, disk, sleuth! with a Forensic Workflow
Disclaimer: This post is my writeup of picoCTF's "Disk, disk, sleuth!". Everything is done on the downloaded image file and never touches a real hard drive.
Why lesson two is the real thing
In lesson one we built the disk ourselves: we put the files there, looked up the inodes, and worked out the blocks by hand. This lesson switches to "someone else's disk": picoCTF 2021's Disk, disk, sleuth!, a disk image of a small Linux system. All the challenge tells you is that there's a flag somewhere inside.
Let me be upfront: strings image | grep picoCTF gets you this flag in three seconds. This post doesn't take that route. It follows a forensic workflow instead — look at the structure, list the files, narrow the scope, and only touch the contents at the very end. The flag is a side effect; the workflow is what you should take away.
Environment
The tool is still Sleuth Kit. After you download the challenge file, if you're on WSL, you'll need to grab it from the Windows downloads folder through /mnt/:
cp /mnt/d/Download/dds1-alpine.flag.img.gz ~/lab/ && cd ~/lab
gunzip dds1-alpine.flag.img.gz
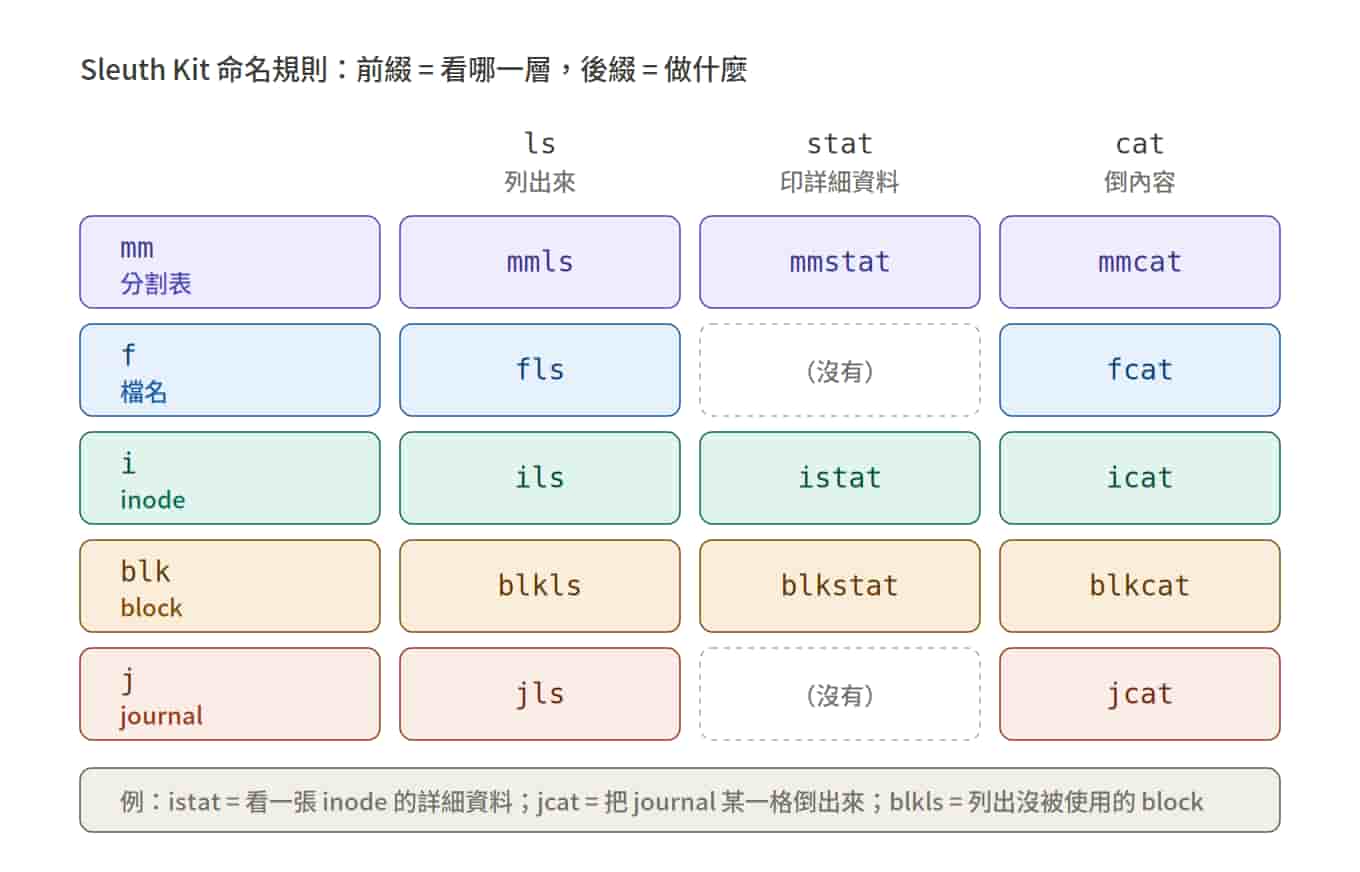
Sleuth Kit's tool names follow a pattern, and once you get it you don't have to memorize them: the first letters tell you "which layer to look at", and the rest tells you "what to do".
- Prefix:
mm= partition table,f= file name,i= inode,blk= block,j= journal - Suffix:
ls= list,stat= print the details,cat= dump the contents
So mmls = list the partition table, fls = list file names, istat = look at one inode, icat = dump one file's contents.
Step 1: Look at the structure
mmls dds1-alpine.flag.img
DOS Partition Table
Offset Sector: 0
Units are in 512-byte sectors
      Slot      Start        End          Length       Description
000:  Meta      0000000000   0000000000   0000000001   Primary Table (#0)
001:  -------   0000000000   0000002047   0000002048   Unallocated
002:  000:000   0000002048   0000262143   0000260096   Linux (0x83)
It looks exactly like the disk we partitioned ourselves in lesson one: sector 0 is the partition table, 1 through 2047 is the 1 MiB alignment gap, and the partition starts at 2048. 260096 sectors is about 127 MiB, type 0x83 Linux.
Key point: remember 2048. Every command from here on uses -o 2048 to tell the tool "the partition starts here". It's the same idea as the -o we gave losetup in lesson one, except the unit is sectors, not bytes.
Step 2: List the root directory
fls -o 2048 dds1-alpine.flag.img
d/d 10161:      home
d/d 11: lost+found
r/r 12: .dockerenv
d/d 2033:       bin
d/d 8129:       boot
d/d 6097:       dev
d/d 16257:      etc
d/d 28449:      lib
...
d/d 26418:      root
...
d/d 20324:      var
V/V 32513:      $OrphanFiles
d/d is a directory, r/r is a file, and the number before the colon is the inode number. Two clues stand out:
.dockerenvmeans this isn't Linux installed on a physical machine; it's a Docker container dumped into a disk image. Containers are usually very clean, so anything extra will stand out.$OrphanFilesis a virtual folder Sleuth Kit adds on its own. It holds files whose "inode is still there, but whose name is no longer on the list". Half-deleted and hidden things show up here, and in real cases it's one of the first places you look.
If you think in terms of "someone deliberately hid something", the priority order is: root (the logged-in user's home), home (are there any other users?), then $OrphanFiles.
Step 3: Browse folder by folder, or dump the whole disk
Put an inode number after fls and it means "list what's inside this folder":
fls -o 2048 dds1-alpine.flag.img 26418   # root
fls -o 2048 dds1-alpine.flag.img 10161   # home
Both are empty, and empty is information too: root was never used, and there are no other users.
Browsing one folder at a time is good for getting a feel for the structure, but in practice the first step is to dump everything: -r recurses all the way down, -p prints full paths, and you save the output to a file. Every call you make after that is made from this listing.
fls -o 2048 -r -p dds1-alpine.flag.img > listing.txt
wc -l listing.txt
grep -c '^\*' listing.txt
1973 listing.txt
0
1973 entries, and 0 of them start with * (deleted, but with the name still on the list). So the flag is sitting there as a normal file. No need to go down the recovery path; the only question is "where".
Step 4: Rule out "someone dropped files into a directory"
In a container, a few of the default directories should be empty. Check the listing to see whether anything sits under them:
grep -E ': (home|root|tmp|opt|srv|mnt|media)(/|$)' listing.txt
It only prints the lines for the directories themselves, with no extra files. So whoever planted the flag didn't take the lazy "add a new file" route: it's hidden inside an existing file, or tucked away in an inconspicuous path.
Step 5: Timeline
Let's switch to an angle real forensics actually uses: time. The image was built in one go, so the modification times of two thousand files will be bunched together in the same window; anything someone touched later will fall out of line.
fls -l adds four timestamps and the size to every line, then sort orders them by modification time:
fls -o 2048 -r -p -l dds1-alpine.flag.img | sort -t$'\t' -k3 | tail -15
Beginner pitfall: with -l, the column order is "type and inode number", then "path", and only then the modification time, so it's column 3, not column 2. The first time, I sorted with -k2 and every line in the output started with var/ — it had been sorted by path.
r/r 30729:  lib/modules/.../tcp_vegas.ko   2021-02-17 04:55:28 ...
r/r 28871:  lib/modules/.../scsi_transport_fc.ko   2021-02-17 04:55:28 ...
r/r 28598:  lib/modules/.../poly1305_generic.ko   2021-02-17 04:55:28 ...
d/d 8129:   boot                2021-02-17 04:55:29 ...
r/r 8136:   boot/ldlinux.sys    2021-02-17 04:55:29 ...
r/r 8137:   boot/ldlinux.c32    2021-02-17 04:55:29 ...
r/r 8138:   boot/syslinux.cfg   2021-02-17 04:55:29 ...   219
Everything is 04:55:28; only the entries under boot are one second later. The timeline doesn't help much in this challenge — the whole disk was generated by a script within a single second, not a machine someone used for a long time. Container images are all like that.
But that "one second later" still tells you something: the last thing touched was the boot config boot/syslinux.cfg, 219 bytes of plain text. If you wanted to hide something somewhere that "looks like a system file but was actually written by hand", a small config file like this is a perfect fit. It's tiny anyway, so just read it.
Step 6: Read the contents
icat -o 2048 dds1-alpine.flag.img 8138
DEFAULT linux
  SAY Now booting the kernel from SYSLINUX...
  SAY picoCTF{Redacted}
 LABEL linux
  KERNEL /boot/vmlinuz-virt
  APPEND ro root=/dev/sda1 rootfstype=ext3 initrd=/boot/initramfs-virt
SAY is a directive that prints a line of text for the user during boot. The first one is normal; the second one is not something a boot config should contain.
While you're here, check the APPEND line and its rootfstype=ext3: this disk is ext3, the same family as ext4, and it has a journal too. That comes into play in lesson three.
So can you just brute-force search?
Yes, and there are three ways to do it, each with its own blind spots:
strings image | grep picoCTFscans the entire disk directly, including deleted data, old versions in the journal, and empty blocks not owned by any file. It has the widest coverage. The downside: when a file is fragmented, the string gets split, and if the flag is base64-encoded, compressed, or cut in half, you won't see it.tsk_recovericats every file on the list and saves each one to a folder under its original path — basically a loop that "dumps every inode". Then you search with ordinary grep and find. It "follows the map": every file's boundaries are right, and fragmented files get stitched back together, but it only covers what's on the list.
tsk_recover -o 2048 -a dds1-alpine.flag.img out/
grep -r picoCTF out/
-a dumps only normal files; -e dumps orphaned and deleted files as well. For this challenge it dumped 1565 files, fewer than the 1973 in the listing. The difference is directories and symlinks, which have no contents to dump.
3. Narrowing the scope is the path this post takes. It's slow, but it doesn't depend on "knowing what the flag looks like".
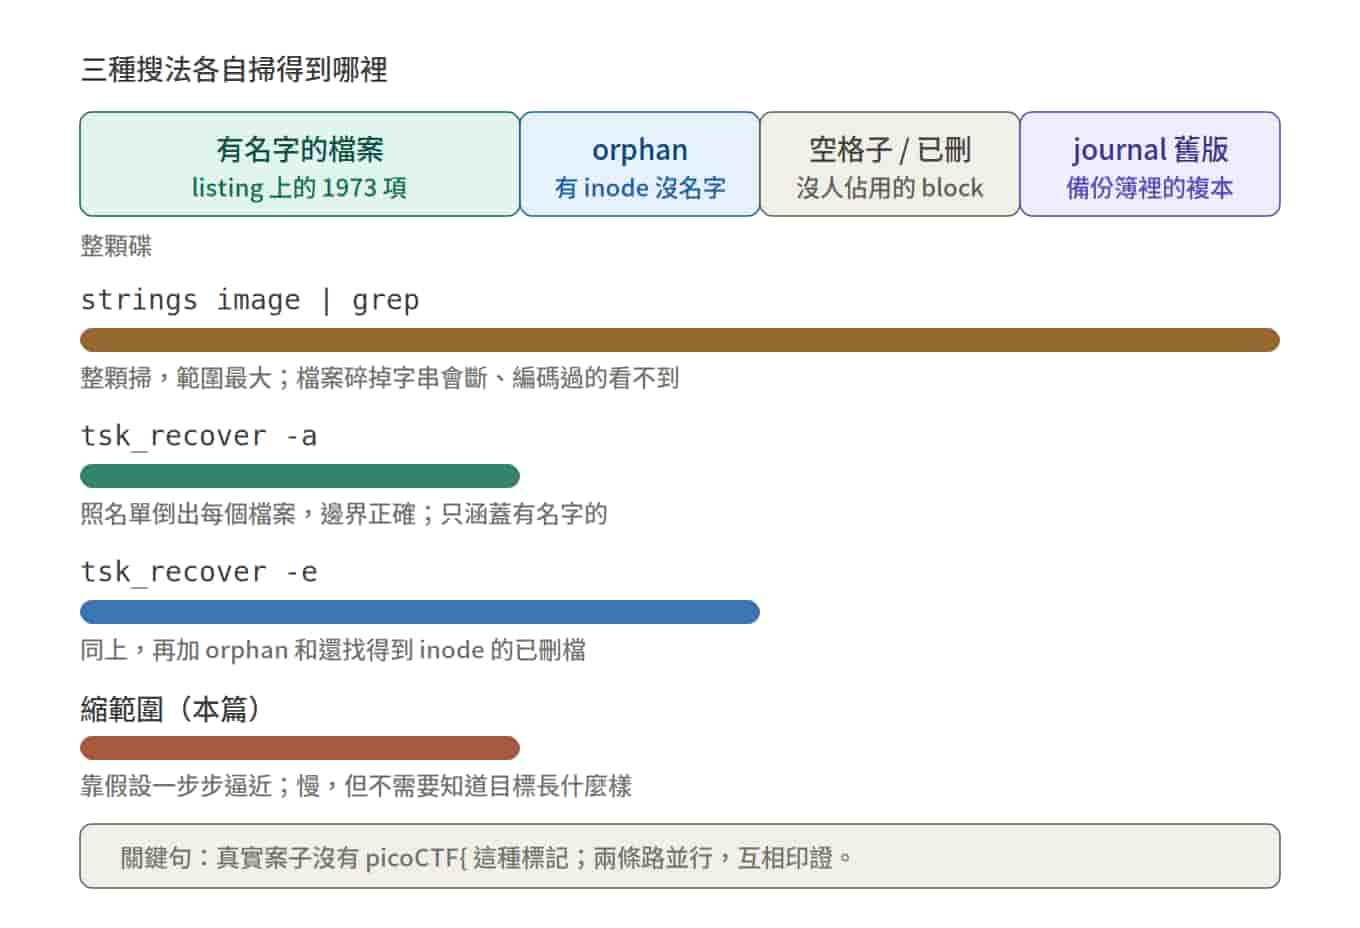
The key line: real cases don't have a picoCTF{. What you're after might be a message, an account, or what happened on a particular night, and you can't grep for something when you don't know what it looks like. The professional approach runs two tracks in parallel: narrow the scope with hypotheses while also scanning the whole disk for known keywords, and let each one confirm the other. This post practices the former.
Wrap-up
Four things to take away from this lesson:
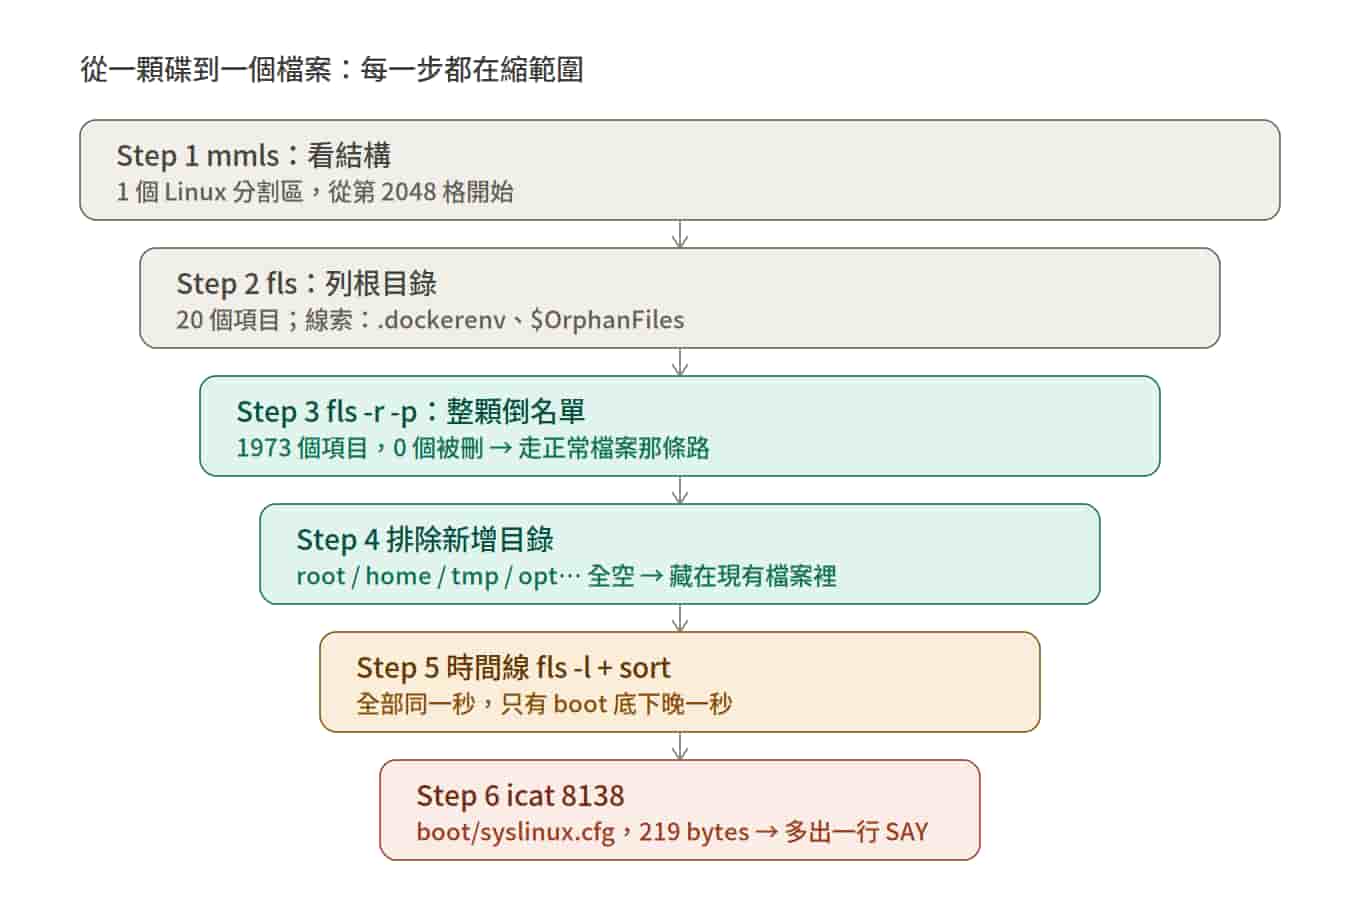
- The order of operations when you're handed a disk: mmls to see the structure → fls to dump the listing → rule things out → narrow the scope → only then icat to read the contents
- Empty directories and zero deleted files are information too; every step narrows the scope
- Timelines are a forensics fundamental. It didn't happen to help here, but before you sort, check which column the field is actually in
- Brute-force searching is a legitimate technique, not cheating, but you need to know what it misses
Happy Hunting!
Member discussion