> ## Content Index
> Fetch the complete content index at: https://taiwanding.com/llms.txt
> Use this file to discover other available public pages before exploring further.
# Vulnmachines - OSINT Series 完整 Writeup (zh-TW)
- URL: https://taiwanding.com/vulnmachines-osint-series-wan-zheng-writeup-zh-tw/
- Published: 2025-09-08T07:38:31.000Z
- Updated: 2026-07-15T02:49:47.000Z
- Author: Kevin Chen
- Tags: CTF, #vulnmachines, #OSINT
## **題目資訊**
- **平台**: Vulnmachines
- **分類**: OSINT (Open Source Intelligence)
- **系列**: 5 個挑戰,6 個 flags
- **題目連結**: [https://account.vulnmachines.com/user/challenges](https://account.vulnmachines.com/user/challenges?ref=taiwanding.com)
- **描述**: "OSINTOrg has created some cool badges. You need to perform an open-source intelligence assessment on their organization and find out about their internet presence and employee information to get the flags and the cool badges."
- 備註: OSINT是很有趣的實際探索過程,建議先自行嘗試再閱讀
## **初始分析與策略**
### **從零開始的思考**
拿到題目後,我們只知道:
1. 有個組織叫 **OSINTOrg**
2. 他們製作了一些 badges
3. 需要調查他們的網路足跡和員工資訊
## **OSINT Lab 1, 2**
**目標**:找到組織的社群媒體帳號和員工檔案
### **Step 1: 使用 Username Checker 工具**
首先使用 NameCheckerr 進行自動化搜尋:
```
訪問:https://namecheckerr.com/
輸入:OSINTOrg
```
**結果分析**:
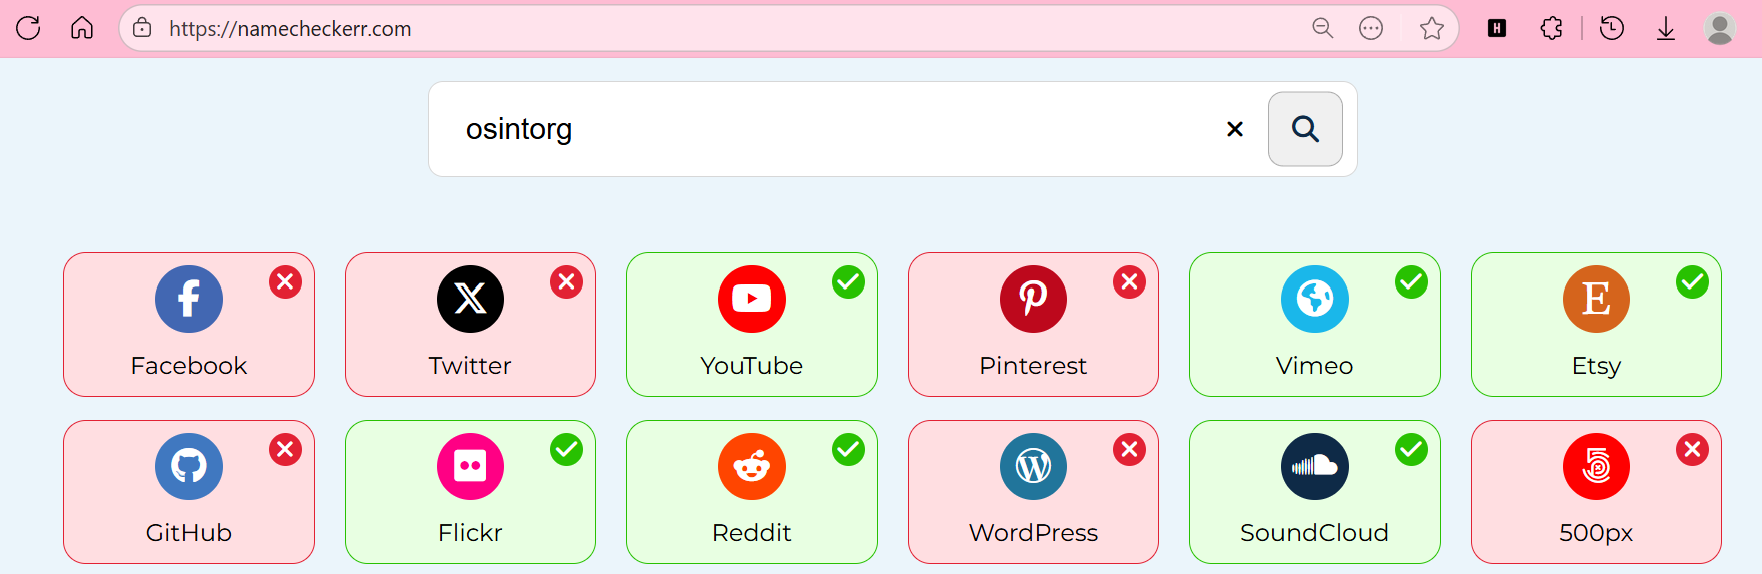
```
✅ 已註冊:
- Twitter/X: @OSINTOrg
- GitHub: github.com/osintorg
```
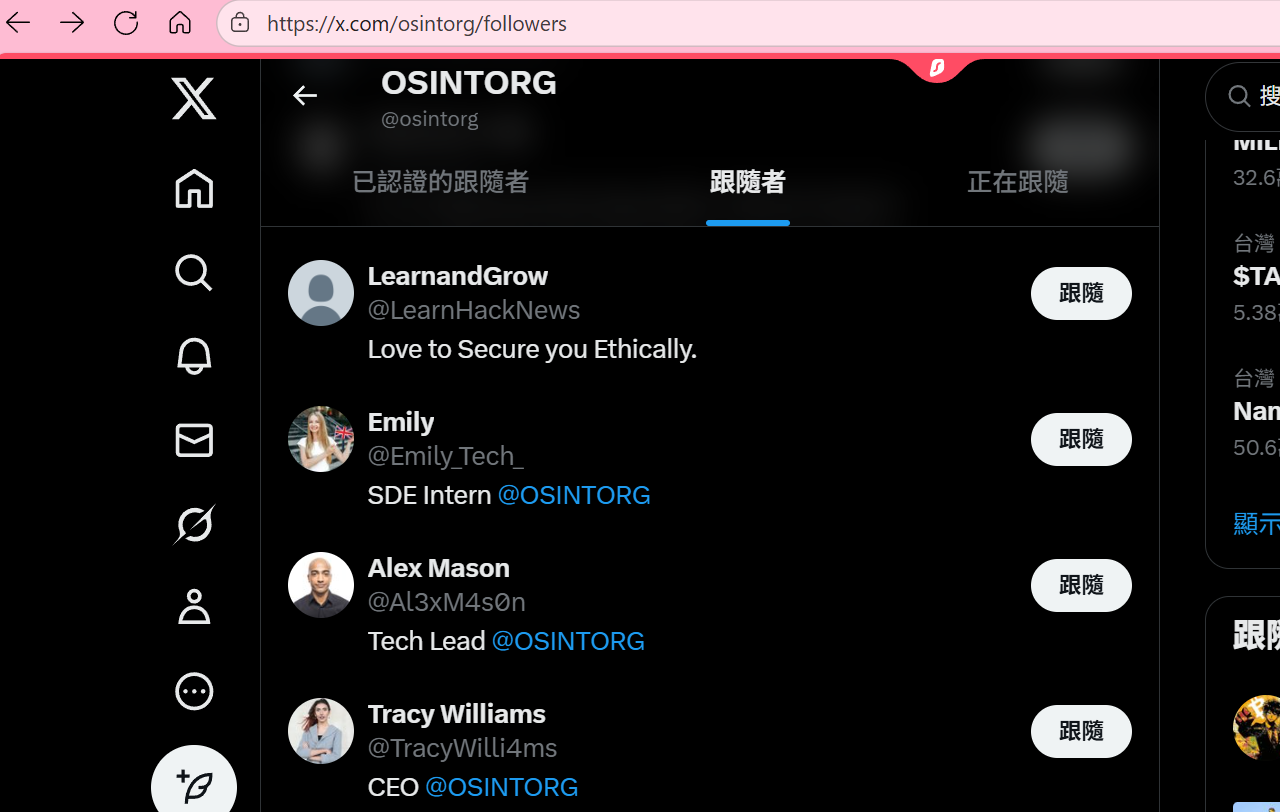
### **Step 2: Twitter 深入調查**
訪問 `https://twitter.com/OSINTOrg`
**關鍵發現**:
```
組織帳號:@OSINTOrg
追蹤者中包含員工:
- Alex Mason (@Al3xM4s0n) - Bio: "Tech Lead @OSINTOrg"
- Emily (@Emily_Tech_) - Bio: "SDE Intern @OSINTOrg"
```
### **Step 3: 分析員工互動**
檢查 Alex Mason 的推文:
```
Alex Mason @Al3xM4s0n
We would to let you know that we have started our development journey for @osintorg.
Visit our GitHub profile here: https://github.com/orgs/osintorg/dashboard
```
Emily 的回覆透露了組織結構和工作分工,並且在留言中找到flag1
> We would to let you know that we have started our development journey for [@osintorg](https://twitter.com/osintorg?ref%5Fsrc=twsrc%5Etfw&ref=taiwanding.com). Visit our GitHub profile here: [https://t.co/QVygQzlKBN](https://t.co/QVygQzlKBN?ref=taiwanding.com)
>
> — Alex Mason (@Al3xM4s0n) [January 17, 2023](https://twitter.com/Al3xM4s0n/status/1615294649358516225?ref%5Fsrc=twsrc%5Etfw&ref=taiwanding.com)
### **Step 4: GitHub 組織探索**
訪問 GitHub 組織頁面:
```
https://github.com/osintorg
```
**發現成員**:
- `emilyosintorg` \- Emily 的 GitHub 帳號
- `alexosintorg` \- Alex Mason 的 GitHub 帳號
### **Step 5: Gist 偵察**
OSINT 經驗:開發者常在 Gist 分享程式碼片段,可能包含敏感資訊
訪問 Emily 的 Gist:
```
https://gist.github.com/emilyosintorg
```
找到 `favicon.js`:
**關鍵:檢查評論區!** 找到flag2
---
## **OSINT Lab 3 - Finding Secrets**
**目標**:找到託管服務(Jenkins)並進行枚舉
### **Step 1: 分析 Gist 中的線索**
回到 Emily 的 `favicon.js` Gist,Alex 的另一個評論:
```
The Jenkins URL is now set to: osintorg-{github-username}-prod.domain-name
```
### **Step 2: 構建 Jenkins URL**
根據格式,可能的 URLs:
```
osintorg-emilyosintorg-prod.osintorg.com
osintorg-alexosintorg-prod.osintorg.com
```
### **Step 3: 端口**8080
Jenkins 預設端口是 8080:
```bash
# 使用瀏覽器或 curl 測試
http://osintorg-emilyosintorg-prod.osintorg.com:8080/
```
**成功!Jenkins 無需認證即可訪問**
### **Step 4: Jenkins 枚舉**
導航路徑:
```
Jenkins 首頁 → 左側選單 → Credentials
```
**Credentials 頁面發現**:
```
Domain: (global)
ID: vnm{open_things_can_lead_to_more_open_things}
Name: vnm{open_things_can_lead_to_more_open_things}
Type: Username with password
```
在這裡找到flag3
### **額外發現**:跟你說可以去哪裡拿full access的flag
```
另一個 Credential:
ID: d9ffec32-ef0d-4fcc-aeff-1dabbe70aeb9
Name: FullBadgeAccess
Description: Get full badge access from bucket badge-fullaccess.amazon.com
```
---
## **OSINT Lab 4 - Cloud Asset Discovery**
**目標**:識別雲端資產
### **Step 1: 檢查 Jenkins 建置日誌**
```
點擊 prod-env-jenkins → Build History → #8 → Console Output
```
**日誌關鍵資訊**:
```
Publish artifacts to S3 Bucket Using S3 profile: s3-osint-jenkins
```
### **Step 2: S3 Bucket 枚舉**
**方法一:瀏覽器訪問**
```
https://s3-osint-jenkins.s3.amazonaws.com/
```
回應 XML:
```xml
FLAG.txt
2023-06-26T08:58:55.000Z
```
[https://s3-osint-jenkins.s3.amazonaws.com/FLAG.txt](https://s3-osint-jenkins.s3.amazonaws.com/FLAG.txt?ref=taiwanding.com)
找到flag4
## **Badge Hacking - 綜合挑戰**
### **Limited Access Badge -**
#### **初期困境**
我們已經找到:
- Emily (emilyosintorg)
- Alex Mason (alexosintorg)
但 Limited Access flag 一直找不到...
#### **突破點:尋找其他員工**
**擴展搜尋策略**:
```
原本的模式:
- emilyosintorg
- alexosintorg
```
**發現 AlexbadgeOsintOrg,在他們的公司追蹤名單裡面發現!**
[Build software better, togetherGitHub is where people build software. More than 150 million people use GitHub to discover, fork, and contribute to over 420 million projects.GitHub](https://github.com/orgs/osintorg/followers?ref=taiwanding.com)
```
https://github.com/AlexbadgeOsintOrg
```
這是另一個 Alex 帳號,專門處理 badge 相關開發!
#### **檢查 Repository**
```
Repository: badge
Commit: Create Limited Badge Access (4aba24c)
https://github.com/AlexbadgeOsintOrg/badge/commit/4aba24c
```
在 commit 內容中找到 flag!
**🚩 Flag 5: Limited Access Badge flag**
### **Full Access Badge**
#### **Step 1: 尋找更多線索**
在搜尋過程中,在emily的gist發現一個包含 S3 連結的 JavaScript 檔案:
[This will lead to badge disclosureThis will lead to badge disclosure . GitHub Gist: instantly share code, notes, and snippets.Gist262588213843476](https://gist.github.com/emilyosintorg/e850c8c4f80639ae841e198206566f0f?ref=taiwanding.com)
```javascript
//jenkins badge-access: https://badge-fullaccess.s3.amazonaws.com/
import React, { useEffect, useState } from 'react'
// ... 程式碼內容 ...
```
#### **Step 2: 訪問 S3 Bucket**
```
https://badge-fullaccess.s3.amazonaws.com/
```
XML 回應:
```xml
s3cr3t.txt
2023-01-17T09:07:45.000Z
```
#### **Step 3: 取得 Flag**
```
https://badge-fullaccess.s3.amazonaws.com/s3cr3t.txt
```
**🚩 Flag 6: Full Access Badge flag**
---
## **工具與技巧總結**
### **必備工具**
```bash
# Username 搜尋
- NameCheckerr (https://namecheckerr.com/)
# GitHub 偵察
- 直接搜尋:github.com/search
- Gist 搜尋:gist.github.com/search
# S3 Bucket 探索
- 瀏覽器:https://bucket-name.s3.amazonaws.com/
# 端口掃描
- nmap -p 8080 domain.com
- 或直接瀏覽器測試
```
## **解題流程圖**
```
OSINTOrg
├── Social Media
│ ├── Twitter → 員工帳號 → 對話中的 Flag
│ └── LinkedIn (可選)
├── GitHub
│ ├── Organization → 成員列表
│ └── Gists → 評論中的 Flag + Jenkins 線索
├── Jenkins
│ ├── Port 8080
│ ├── Credentials → Flag
│ └── Build Logs → S3 Bucket 線索
└── AWS S3
├── s3-osint-jenkins → Flag
└── badge-fullaccess → Flag
```
## **總結**
這個 OSINT 系列巧妙地模擬了真實世界的資訊收集場景,從最基礎的社群媒體搜尋開始,逐步深入到技術資產的探索,最後需要綜合所有技能才能完成 Badge Hacking 挑戰。
## 經驗分享:
這個挑戰最有趣的幾個點,都圍繞在github上面
1. 查詢公開的gist
2. 利用組織的github找到其他公司的員工
3. 可以看到repository中的過去commit
大功告成!